Important: The GCConnex decommission will not affect GCCollab or GCWiki. Thank you and happy collaborating!
Help:Basic editing
Editing Wiki
Don't be afraid to edit articles on Wiki! You don't have to be an official Wiki editor or have special training or permission to make changes or additions. Anyone with a valid government of Canada e-mail address can create an account and become a Wiki member.
Once you are a Wiki member, you can edit the articles, so find something that needs to be fixed, like a spelling error or typo and fix it. In addition to fixing errors, you can be a creator. Are you really interested in a certain policy issue or government program? You can contribute to the articles on topics that interest you. Start by adding sentences and paragraphs. When you get more confident, you can even create an entire new article.
To edit a section:
- Click the small Edit link on the heading's line. However, a user must have an existing account and should be logged in to be able to edit.
- An edit window opens and the user can now go ahead and edit as required.
- To view what you have edited before saving, a user can click on the <show preview> button at the bottom of the screen and, if satisfied, save the page.
How to Save after Editing:
Once a user is satisfied with what has been edited and/or previewed, user can do the following:
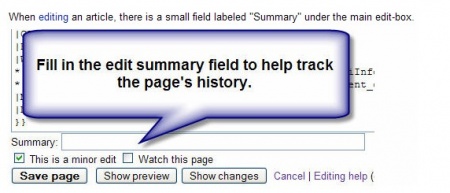
- Go to the Edit Summary and summarize what has been done to the document in the Summary window below the editing screen
- Check the This is a minor edit box below the summary window and then
- Press the Save Page button
- To cancel, just click the Cancel link and none of your changes will be saved
Understanding the Edit summary
An edit summary is a brief explanation of an edit to a page. When you edit a page there is a small text entry field, labeled "Edit summary", located under the main edit box and above the "Save page" button. Edit summaries are displayed in lists of changes (such as page histories and watchlists), and at the top of diff pages.
Always Summarize Your Edits
When you make an edit, major or minor, always put at least a single word summary in the Summary text box. This allows others who have selected that page for their watchlist to know, at a glance, what has been changed.
Minor edits
If you are making minor changes such as spelling corrections, formatting, and minor rearrangement of text:
- Check the box marked "minor edit".
Marking a significant change as a minor edit is considered bad behaviour, and even more so if it involves the deletion of some text. If you have accidentally marked an edit as minor, a best practice is to edit the page again, mark it major (or, rather, ensure that the check-box for "This is a minor edit" is not checked), and, in the summary, state that the previous change was a major one.
Major edits
All editors are encouraged to be bold, but there are several things that you can do to ensure that major edits are performed smoothly.
- Before engaging in a major edit, consider discussing proposed changes on the article discussion/talk page.
- Additionally, making major changes on a subject outside of one's expertise area should also first be discussed.
- Once the edit has been completed, make sure you include a summary of the edit stating that you made a major change.
Edit conflicts
To understand what an edit conflict is, consider the following situation:
- Alice clicks "Edit this page" on a page.
- Bob clicks "Edit this page" on the same page while Alice is editing.
- Alice finishes her edits and clicks "Save page". The page is saved with Alice's version while Bob is still editing.
- Bob finishes his edits and clicks "Save page". Bob gets an "edit conflict" page.
See Wikipedia Help:Edit conflict for more information.
Show preview
Below the edit box is a Show preview button.
- Pressing this will show you what the article will look like without actually saving it.
- It is strongly recommended that you use this prior to saving.
- This allows you to check what the page will look like first and to check that you haven't made any errors.
- It also prevents the need for multiple saves.
- Saving the same article a large number of times in quick succession makes it harder for people to check what changed, and clogs up the page history.
See Wikipedia Help:Show preview for more information.
Understanding the Editing toolbar
- The Wiki editing toolbar appears as soon as you click edit at the top of an article.
- Place your cursor over parts of the toolbar to see a description of what they do.
For a more detailed breakdown of the various icons, see Help:Understanding the editing tool bar.
Creating headings
Headings are recommended in wiki formatting, particularly for large articles.
- Headings appear as larger text, making distinctions between different sections
- The text under headings can be edited, making it easier to make changes to smaller parts of a large document
- With four or more headings a table of contents is automatically generated. This makes it much easier to jump to sections of larger pages.
To create a heading, there are two options:
- Place = on both sides of the text. For example: ==Heading here==
- Highlight the heading text and click on the heading section of the toolbar. For larger headings pick a lower level i.e. Level 2 will have larger text than level 3.
==This is what the code for a sample heading looks like==
To create a sub heading, add a new heading with one more = sign on both sides.
For example this:
== Heading 1 ==
=== Heading 2 ===
==== Heading 3 ====
Creating footnotes
In the main body of the article, immediately after the text you want to footnote, write the footnote text preceded with <ref> and followed by </ref>. [1]. To display the list of footnotes, create a "Footnote" section (recommended) at the bottom of the page and include the <references/> code (or {{Reflist}} ).
Footnotes (example)
- ↑ This is a footnote
Wiki syntax
Applies Anywhere
| Description | You type | You get |
|---|---|---|
| Italicized text
Insert text to be rendered in italics between two single quotes at the beginning of the text, and two single quotes following the text |
''italic'' | italic |
| Bold text
Insert text to be rendered in bold between three single quotes at the beginning of the text, and three single quotes following the text |
'''bold''' | bold |
| Bold and italic
Insert text to be rendered in bold and italic between five single quotes at the beginning of the text, and five single quotes following the text |
'''''bold and italic''''' | bold and italic |
| Internal links (to content within the GCcollab Wiki)
Text within double square brackets results in a hyperlink to a page with that name. Text within double square brackets followed by a pipe character and descriptive text results in that text displaying as a hyperlink to a page with that name. If there is no page with that name, the hyperlink will appear in red, inviting you or others to provide content. A Wiki page name in square brackets followed by a pipe character results in a link without a namespace. |
[[Wiki gnome]] [[Wiki gnomes | helpful people]] |
Wiki gnome |
| External links
A URL in single square brackets results in a hyperlinked number within single square brackets, followed by an arrow point upwards to the right. There is no text. A URL between single square brackets followed by a space and text results in hyperlinked text A URL inserted in the text without square brackets is rendered as a hyperlinked URL |
[http://www.ragu.com]
|
[1] |
| Sign your posts
Method 1: insert four tildes (~, above tab key) preceded by a pair of dashes. |
--~~~~ | --Marc.Labreche 14:40, 29 April 2009 (EDT) |
Applies Only at the Beginning of the Line
| Description | You type | You get |
|---|---|---|
| Headings
(equal sign) (=) Note: A Table of Contents will automatically be generated when four headings are added to an article. |
== Level 1 == |
Level 1Level 2Level 3Level 4Level 5 |
Bulleted list(asterisk) (*) |
*Dogs
*Cats |
|
| Numbered list
(pound sign) (#) |
#Dogs #Cats |
|
| Indented list
(colon) (:) |
:Dogs :Cats |
|
See also
- Wikipedia Help:List for more list options.
- Wikipedia Cheatsheet
- Wikipedia Cheatsheet PDF (Print it out and place on your wall behind your monitor!)
- NRCan wiki hints (a pretty comprehensive list of editing and formatting for beginners)
- http://www.user.uni-hannover.de/nhtcapri/mathematics.html (lists special characters (including arrows and math symbols) that can be used directly in plain text in HTML 4, i.e., without resorting to the Symbol font or to graphics).
- http://www.bigbaer.com/sidebars/entities/ (special expanded character list includes all standard html character entities as well as smiley faces, astrological signs, chess pieces, musical notation and other hard to find characters & symbols. Note that the entity names are case sensitive.)
External links
- Wiki Mark-Up
- Consult MediaWiki Help:Formatting for a listing of the wiki markup you will use most often.
- WikiMedia Editing Help
- Check out the Wikipedia Editing Tutorial . Browsing through the tabs and links will provide you with pretty well everything you need to know to create, edit, format and use the Wiki. Wikipedia is based on the same software and uses many of the same conventions as the Wiki.
- A great 1 page reference card you may find useful
- Surf Wikipedia with Keyboard Shortcuts

